About This Information
The material and illustrations on this page are directly copied from the instructions in the "Lineco Museum Mounting Kit" with the consent of Lineco. We highly recommend this product which can be purchased at your local art shop or DickBlick.
We realized the need for this information and felt that Lineco, in addition to making great archival products, wrote a set of instructions that we could only be second best to. So with their permission, we reformatted their instructions for effective web presentation as shown here. We feel that this is the best way to mount fine artwork, but Expresso Beans cannot responsible for any adverse effects this information may have on the readers or their art work. If you want to try this DIY, do a test run or two on something like a heavy Hahnemuhle paper or at the very least some blank manila stock to get a feel for it before gluing a paper hinge on the back of your actual print.
Museum Mounting Instructions
All you need to do conservation quality hinging of works of art.
- Wheat Starch Adhesive
- Japanese Hinging Paper
- Blotting Paper
- Mylar Separation Sheets
- Linen Tape for hinging window mat to the background
TIPS:
- Never cut or fold art to fit the frame.
- Use archival quality mat boards, not acidic mat.
- Don't wet or dry mount art. Never use cellophane or masking tape or nonarchival adhesives.
Make the Hinges
 Tear the paper for the hinges, tearing gives a "feathered" look and makes hinges less visible.
TIPS:
- Use the smallest hinge which will support the art.
- Tearing paper: Drawing a water line with a small brush before tearing helps create a nice feathered edge.
Prepare the Adhesive
MICROWAVE COOKING:

 * Tsp. dry wheat starch
 * 6 Tsp. water (distilled, filter or deionized)
- Place 6 Tsp. of water in a container. Slowly add 1 Tsp. dry wheat starch and stir until it is completely mixed.
- Place the uncovered container off-center in the microwave. Cook at medium-high, stiring every 10 seconds.
- After 30-35 seconds the paste thickens and becomes translucent.
- Cover and let stand. The cool paste forms a semi-solid mass.
- Transfer amount needed to a second container by pressing through a fine strainer. Paste may become thinned for use. Dilute with water to a thin, cream-like consistency. Unused paste should be stored unrefrigerated in a cool, dark place. Discard when a sour smell is noticeable (2-5 days).
Quantities may be adjusted and will affect cooking times. The type of appliance and alititude will also affect cooking times.
Apply the Hinges
| Two Types - T-Hinge and V-Hinge
|
|
|
|
| T-Hinge
|
V-Hinge
|
| Use when hinge can be hidden by the window mat.
|
Hinge is invisible allowing edges of art to show.
|
TIP: Use T-Hinges if possible. They are easier to make and the art gets gentle support on all sides from the window mat.
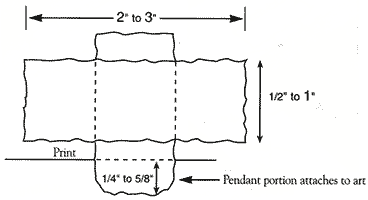
Adhering the Hinge to the Artwork
(Applicable to both T-Hinge and V-Hinge)
- Position the art face down.
- Brush adhesive onto 1/4"-5/8" of the pendant hinge; allow to air dry 5-7 minutes.
- Place pasted pendant onto the back of the art.
- Use blotter paper 5 to 10 times to remove excess water from the hinge so it does not affect the art.
- Place a fresh blotter over the hinge and weight with a flat, heavy, clean object. Dry for 30 minutes or more.
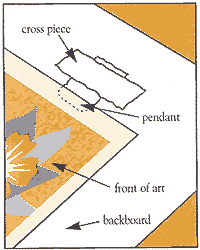
Adhering the Hinged Artwork to the Mounting Board
- Brush adhesive onto a cross piece.
- A) If you are covering the hinge with a window mat use a T-Hinge as follows:
- Position the art and place the cross piece across exposed portion of the hinge on the backboard.
- Blot to remove excess water.
- Weight and leave for 30 minutes or longer.
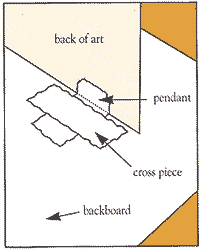
- B) If you are "floating" the art so the edges of the art are visible within the window mat use a V-Hinge as follows:
- Position art face up on the backboard. Fold exposed hinge behind art. Lift up art and apply cross piece across exposed portion of the hinge. Blot to remove excess water. Place the plastic Mylar piece on top of the hinge and under the art to keep the adhesive from contacting the back of the art.
- Fold art down. Place clean paper over the hinge and weight. Leave for 30 minutes or longer.
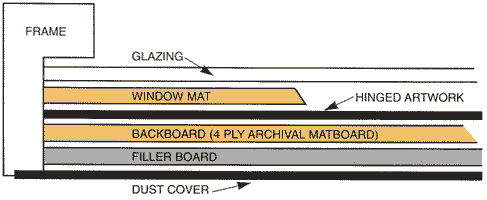
Side View Final Framing
Reversing the Hinges
When and if the art needs to be removed from the backing, the currently recommended method is to cut the hinge off the mat, leaving the part pasted to the art in place. It can be pasted over on the next mounting. Otherwise, one can still dissolve the paste with a wet Q-tip and lift it off, and even clean off the residue.


